Configure the update server
Overview
Legacy ESET applications with End of Life status are disconnected from the public ESET update servers. With ESET Extended Support, legacy ESET applications receive selected module updates from a dedicated update server:
https://update.eset.com/redir/extendedsupport
The update server supports HTTP and HTTPS connections.
In this article, management console means ESET PROTECT On-Prem, ESET Security Management Center (ESMC) or ESET Remote Administrator (ERA).
Prerequisite
Activate the legacy ESET applications with an ESET subscription that has ESET Extended Support enabled.
Important: Mixed environments
A mixed environment contains supported ESET application versions (Full Support or Limited Support) and unsupported ESET application versions (End of Life).
Before you change the update settings, create a separate group in your management console for the unsupported ESET applications. Assign the update settings only to that group.
Some ESET application versions are compatible only with specific management console versions. Manage these ESET application versions from separate management consoles. For example:
•Manage ESET Endpoint Security for Windows 8.0 from ESET PROTECT 9.1 or a later version of ESET PROTECT On-Prem.
•Manage ESET File Security for Windows 4.5 from ESET Security Management Center 7.2. ESET File Security for Windows 4.5 is not compatible with later management console versions.
Select your scenario
•Scenario 1: Receive module updates automatically (for most users)
•Scenario 2: Set the update server manually (for users with connection problems in Scenario 1)
•Scenario 3: Use a local mirror (for users who need a local mirror)
Scenario 1: Receive module updates automatically
In the most common configuration, the ESET applications connect directly to the ESET update servers. With Choose automatically enabled, the ESET update servers send the module updates to the ESET applications automatically. If Choose automatically is already enabled, you do not have to change the update settings.
Prerequisite: The ESET applications have internet access, directly or through a proxy server.
1.In the management console, create a new policy for the ESET endpoint application.
2.In the policy settings, click Update > Profiles > Updates.
3.In the Modules Updates section, enable Choose automatically.
4.Assign the policy to the group computers with of unsupported ESET applications.
|
1.Open Setup > Advanced setup and click Update > Profiles > Updates.
2.In the Modules Updates section, enable Choose automatically.
3.Click OK. |
Scenario 2: Set the update server manually
Use Scenario 2 if an ESET application cannot connect to the update server with Choose automatically enabled. Set the update server address, the username and the password manually.
Prerequisites:
•The ESET applications have internet access, directly or through a proxy server.
•You have the username and password of the ESET subscription that has ESET Extended Support enabled.
1.In the management console, create a new policy for the ESET endpoint application.
2.In the policy settings, click Update > Profiles > Update mirror and enable Create update mirror.
3.Click Update > Profiles > Updates.
4.In the Modules Updates section, disable Choose automatically.
5.In the Custom server field, type https://update.eset.com/redir/extendedsupport.
6.In the Username and Password fields, type the username and password of the ESET subscription.
7.Assign the policy to the group computers with of unsupported ESET applications. |
1.Open Setup > Advanced setup and click Update > Profiles > Update mirror.
2.Enable Create update mirror.
3.Click Update > Profiles > Updates.
4.In the Modules Updates section, disable Choose automatically.
5.In the Custom server field, type https://update.eset.com/redir/extendedsupport.
6.In the Username and Password fields, type the username and password of the ESET subscription.
7.Click OK.
If the Create update mirror option is disabled with a lock icon, your machine is managed by management console. You need to apply the setting using the console.
|
Scenario 3: Use a local mirror
A local mirror downloads module updates from the ESET Extended Support update server and distributes the module updates to the ESET applications in your network.
Make sure that only legacy ESET applications eligible for ESET Extended Support connect to the local mirror.
Step 1: Create the local mirror
If you use the Mirror Tool to serve updates to your local endpoints, you need to re-run the MirrorTool.exe or change the recurring task you have set up. Do not change the update server address in the settings of ESET applications that connect to this mirror.
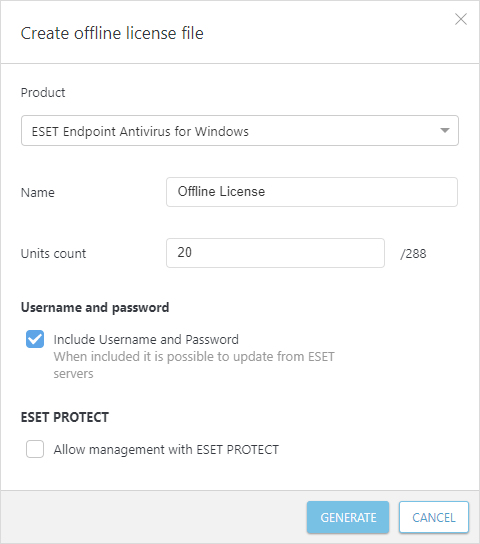
1.Obtain the offline license file (.lf) for the ESET license with the enabled ESET Extended Support via ESET Business Account. Select the Include Username and Password check box to enable updates from ESET servers.
2.Run the Mirror Tool with the parameters to set the update server address and assign the downloaded .lf license file:
--updateServer https://update.eset.com/redir/extendedsupport --offlineLicenseFilename <path-to-license-file>
3.Make the Mirror Tool output folder available to the client computers through an HTTP server or a shared folder. |
Prerequisites:
•The ESET endpoint application on the mirror computer is activated with an ESET subscription that has ESET Extended Support enabled.
•The mirror computer has internet access.
The settings below apply only to the mirror computer.
ESET endpoint application managed from a management console
1.In the management console, create a new policy for the ESET endpoint application.
2.In the policy settings, click Update > Profiles > Update mirror and enable Create update mirror.
3.Click Update > Profiles > Updates.
4.In the Modules Updates section, disable Choose automatically.
5.In the Custom server field, type https://update.eset.com/redir/extendedsupport.
6.In the Username and Password fields, type the username and password of the ESET subscription.
7.Assign the policy only to the mirror computer.
ESET endpoint application on an individual computer
1.Open Setup > Advanced setup and click Update > Profiles > Update mirror. Enable Create update mirror.
2.Click Update > Profiles > Updates.
3.In the Modules Updates section, disable Choose automatically.
4.In the Custom server field, type https://update.eset.com/redir/extendedsupport.
5.In the Username and Password fields, type the username and password of the ESET subscription.
6.Click OK.
If Create update mirror has a lock icon, a management console manages the computer. Configure the setting in a policy in the management console.
|
Step 2: Configure the ESET applications to use the local mirror
Set the update server in the unsupported ESET applications. The update server address depends on the update source:
Update source
|
Update server address
|
Local mirror created with an ESET endpoint application
|
http://<mirror_computer_IP_address>:2221
|
Local mirror created with Mirror Tool
|
HTTP server:
http://<mirror_server_address>:<port>
Shared folder:
\\<mirror_server_name>\<shared_folder>
|
1.In the management console, create a new policy for the ESET endpoint application.
2.In the policy settings, click Update > Profiles > Update mirror and enable Create update mirror.
3.Click Update > Profiles > Updates.
4.In the Modules Updates section, disable Choose automatically.
5.In the Custom server field, type the local mirror address.
6.Assign the policy to the group computers with of unsupported ESET applications.
If the local mirror is on an ESET endpoint application, do not assign the policy to the mirror computer.
|
1.Open Setup > Advanced setup and click Update > Profiles > Update mirror.
2.Enable Create update mirror.
3.Click Update > Profiles > Updates.
4.In the Modules Updates section, disable Choose automatically.
5.In the Custom server field, type the local mirror address.
6.Click OK.
If the Create update mirror option is disabled with a lock icon, your machine is managed by management console. You need to apply the setting using the console.
|


